Sunday, September 23, 2012

Equines Rule in Furniture with Soul Show

Over the summer Gallery NAGA, in Boston, assembled an ambitious international show of top tier studio furniture artists that included makers profiled in David Savage's book Furniture With Soul - Master Woodworkers and Their Craft. I haven't read the book so I won't be providing any review here, but I have read reviews and from what I understand, it is an impressive survey of top tier US and British furniture makers. This show included artists that were featured in the first section of the book. Next year, Gallery NAGA is planning on exhibiting artists that were included in the second section.

Because these are the best of the best (though, as with any curatorial process, no one can agree who these should be and many of my favorites aren't in the book), it was a surprise to me that I would have such clear and definitive favorites in the show. Interestingly, they turned out to be pieces inspired by equines. First, there is this set of Zebra Cabinets made by John Makepeace, a British artist whose work I had never seen before.
Zebra Cabinets
black oak and holly marquetry, burnished lacquer interior
John Makepeace
2012
Seeing these pieces in person made me think that there weren't enough superlatives to describe them. They aren't just remarkably imaginative, playful, elegant, and refined, they are exquisitely perfect at every level of concept, design, and execution. "Breathtaking" would theoretically be a good word to use but it really doesn't do them justice.  
Zebra Cabinet (inside)
Zebra Cabinet (closeup)
And then there is Judy Kensley McKie's new Grazing Horse Table. No, it isn't wood, but as I've said before, I make an exception in reviewing Judy's work. It is typical of her designs in being graceful, elegant, and an original interpretation of an animal that so often depicted in art that it is hard to imagine a new take on it. She pushes the boundary of how a horse is perceived, keeping only what is essential for the viewer to understand the subject. I also like how she uses the strength of bronze to make such delicate legs and tail.  
Grazing Horse Table
Bronze
Judy Kensley McKie
2012
Grazing Horse Table (second view)
Though not a horse, John Cederquist's kimono cabinet, titled Big Kanji, is still a great piece. It is an innovative combination of marquetry, sculpture, painting, and furniture design. 
Big Kanji
mixed wood marquetry, analine dyes, epoxy resin
John Cederquist
2010
In spite of its sculptural form, it is still a very functional piece, but what I really loved about it was the mechanism for opening the big door. There is a lever underneath the small cabinet on the right that you pull and the door swings open very gently in a way that is reminiscent of a bank vault. 
Big Kanji (second view)
 
Big Kanji (third view)
In addition to his phenomenal Zebra Cabinets, John Makepeace had two very beautiful and unique Trine chairs as well as a stool made in a similar style. The chairs are made with alternating layers of laminated yew (light color) and 5000 year old bog oak (a natural, almost black, color).
Trine Chairs
5000 year old bog oak and yew
John Makepeace
1994
Trine Chair (second view)
Though this stool seems to be made with a similar techique as the chairs, the concentric circles are actually made with marquetry rather than sculpted lamination.
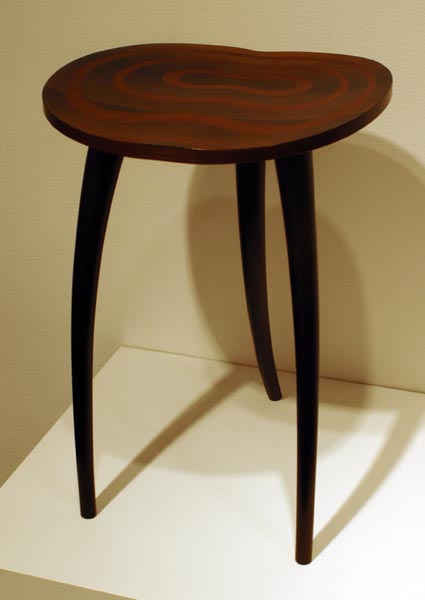
Trine Stool
5000 year old bog oak and mulberry marquetry
John Makepeace
1994
Incidentally, in looking through a catalog of John's work, as well as his website, I am amazed at the complete mastery he shows of a wide range of styles and techniques. It really is a remarkable achievement. Especially considering most artists have very distinct styles that are instantly identifiable. With his work, however, the only consistency is an impeccable level of design and craft.

Garry Knox Bennett had three pieces in the show. First is this coffee table made with a nautilus shell. 
coffee table
claro walnut, nautilus shell, epoxy, color core
Garry Knox Bennett
2012
I think the nautilus shell really makes the piece, especially with Garry's splash of color.
coffee table (close-up)
Garry also had this combination desk/chair in the show. 
vanity with Z chair
rosewood, yellow satinwood, copper, paint
Garry Knox Bennett
2012
Every time I see one of Garry's Z Chairs, I'm amazed by the physics of them. I can't understand how anyone can make one of these things and not have it collapse like an accordion the first time it is used. But, because I know it is one of his signature pieces, and he has made many of them, I am completely confident that he has figured out a way to make it work - but it still doesn't seem possible to me, must be some form of magic.
Z chair (close-up)
A chair I did sit in, and I can attest to its absolute comfort, is Peter Danko's NoCo 2 Chair.  
NoCo 2 Chair
ash, Macassar ebony, die cut automobile tire, steel
Peter Danko
1999
Looking underneath, you can see he engineered some unique springs with automobile tires. Perhaps it should be called a "Goldilocks Chair" because the springs are stiff, but not too stiff, flexible, but not too flexible.
NoCo 2 Chair (close-up)
Having also sat in Peter's Atmos Rocker, I can say that he seems to have given an uncompromising priority to the user's pleasure.
Atmos Rocker
ash, lacquer, automobile seat belt webbing
Peter Danko
1999
Surprisingly, though Thomas Hucker's Side Chair looks as if a priority is given to its sculptural qualities, is also extremely comfortable. The back rest gives support, flexes, and provides the user with a very pleasing massage.
Side Chair
wenge
Thomas Hucker
2010
Michael Hurwitz's Twelve Leaf Resin Table is a captivating combination of nature-inspired art and engineering. 
Twelve Leaf Resin Table
ash, wenge, epoxy resin
Michael Hurwitz
2012
To get a sense of the enormous effort needed to create this table, check-out this time lapse video of the process Michael filmed while doing a residency at San Diego State University.
SDSU Artist-in-Residence Spring 2012: Michael Hurwitz from Matthew Hebert on Vimeo.
The contrast between the ash and wenge is particularly dramatic. In many situations it could be too much but with the soft tones of the leaves, it works very well here.
Twelve Leaf Resin Table (close-up)
I found Jack Larimore's Abide to be an interesting variation on a tête-à-tête, perfect for people that aren't on good terms.
Abide
paulownia, steel
Jack Larimore
2009
Abide (second view)
And finally, there is David Savage's Perseus, a chair named after the Greek hero famous for slaying Medusa. I suspect the multi-snake-like backrest is a reference to that story. To tell the truth, I didn't try it out because I didn't feel worthy. It looks very regal (perhaps that is the British influence). I'll have to wait for him to make something for common folk before I'll pass judgement on the comfort of his work.
Perseus
waxed English sycamore, Macassar ebony, applewood, and suede upholstery
David Savage
2010
Given the impressive line up of artists that was assembled for this show, and the quality of the pieces they provided for it, I look forward to the second half next summer. 

Tuesday, September 18, 2012

Building A Canoe: Steps V, VI, VII

We'll, the cool weather has finally started to creep into Vermont and now I feel an definite urgency in working on the canoe if I want to get it into the water before it ices. Once it gets below 50 degrees, I'll have to bring it indoors to finish the epoxy work but I'd really rather not have it set up in my living room. 

Step V - Finish Stripping
I found the stripping process to be very slow. It would take between 1.5 to 2 hrs to complete a full row all the way around. No doubt it would have been faster had I just used one type of wood, or even if I had a set pattern with different woods, but, counter-intuitively, there is much more thinking involved in trying to do something that looks random; that, along with getting small sections to fit tightly, changing between drill (definitely need to pre-drill the holes for screwing down the strips) and driver, and dealing with all the clamps, it was just a very slow process.  
I finished stripping on August 18. The last row was a little tricky because I needed to shape two pieces with a bead on both sides. They also had to be sculpted over a length of about ten inches from 3/4" wide to a point but I found my Lie-Nielsen 102 block plane was the perfect tool for the job. It was great to see them slide into place perfectly. The final count was 69 rows. I had planned on using only one strip of cherry but ended up using three, one on each side and one on the bottom. In addition, I had been worried about not having enough strips but, in the end, I had plenty, with 350 feet left over. In retrospect, 1200 linear feet would have been perfect (I started with 1385) but I'm sure I can find a use for my surplus. I'm thinking of making a flat wall piece with them. I think it would look great to have them displayed next to each other. 
Step VI - Fill Holes With Dowels
After stripping, my next step was to drill out all the staple and screw holes and fill them with 1/8" and 3/16" maple dowels. I had no idea how many 36" dowels to buy so I was glad to have a local source. I ended up making five trips to Spooner Specialties, picking up a total of thirteen 1/8" dowels and nine 3/16". I didn't count my holes but if I assume the my dowel length was 1/2" per hole, I filled over 900 1/8" holes and over 600 3/16" holes -- probably pretty close to the actual but I'm not interested in finding out the exact number. By the way, fair warning to any copycat canoe builders out there, forcing the 1/8" dowel into the 9/64" hole I drilled into the basswood was not fun. It was a real tight fit because the basswood didn't cut cleanly (I think the humidity of summer had something to do with it but filling the walnut holes was so much easier). My blisters have at least healed but I still have a sore shoulder.
I needed to take the canoe off the forms early in order to finish putting the dowels in the stems. 
In addition, I didn't feel comfortable with the design of the stems. I felt they needed some additional reinforcement. Ideally, there would have been a laminated strip inside the stem that the strips could be attached to, but it was too late for that so I ended up sticking 5/16" dowels through both sides and epoxy-ing them in place. I think this will work as well as anything. 
Step VII - Cleanup and Fill Gaps
The next step was to clean it up, shape the stems, and fill any holes/gaps. One of the problems with using walnut is that it didn't flex as well as the basswood so I did have a fair amount separation on the tight curves. Nothing too extreme, but definitely noticeable. I tried to make an epoxy putty that would match the wood using PC-11 (marine epoxy) and Transtint's Dark Mission Brown dye. For some reason it came out more gray than I would have liked but it was good enough.
It took about three rounds of sanding and refilling the holes. Luckily, I have a real nice Festool sander/grinder (it can be partially seen on the right side of the last image). Between cleaning up all the dowels, glue, and epoxy, I don't think I would have wanted to use anything else. I started with 36 grit paper (touching very lightly), and worked down to 120 grit. Gil Gilpatrick said that anything smaller than 80 grit doesn't make a difference but the sander/grinder leaves a very distinct sanding pattern so I wanted to go smaller. In addition, I went back and hand sanded with 100 grit paper just to make sure it looked good.  
 And there it is, prepped and ready for the first coat of epoxy!

Saturday, August 25, 2012

Be Very Selective

I just installed my outdoor juried show submission for this year's Burlington Art Hop on Friday. It is the most conceptual piece I've ever made but I tried my best to make it aesthetic as well. 
Be Very Selective Before Entering; Choose Wisely Before 
Looking Out; Make An Even More Careful 
Consideration Before Exiting 
wood and paint
84" x 48" x 41"
2012
©Robert Hitzig
 Be Very Selective . . . (second side)
 Be Very Selective . . . (third side)
My hope is that people will interact with it. I'd like to see both children and adults climbing in, looking out, and being involved with it somehow. I'll consider the piece a success if it happens. I didn't realize how playful primary colors are until I finished it, so I am real happy with the paints (though, if I weren't using paints I had handy, I probably would use a brighter yellow). When I was inside, I also felt it had both playful and meditative/contemplative presence but I'm anxious to see if that actually comes through for other viewers as well.

Addendum: September 12, 2012

Success! To my surprise, I found that children seemed to love the sculpture. Whenever I went by it over the weekend, during the Art Hop, I found children attracted to it and climbing all around it. In addition, I had numerous conversations with people who said they saw children in and around it. Glad to see some people still know how to have fun.
Be Very Selective ... (in use)
September 8, 2012

Thursday, August 16, 2012

Flag Updates

In May, as I posted previously, I was at the Vermont Studio Center and worked on my flag series. I wasn't happy with this one, the nine sided flag. I've had doubts about the center section but finally, this week, I've been able to work on it again and make the changes I wanted. I'm much happier now.
In the new version I have nine bars (random length, random width, random placement) to fill the center. They are made with quarter sawn bird's-eye maple. I've never seen any one use it before but I think it looks fantastic. It cuts across the depth of the bird's-eyes and creates an effect much like a curl but with an intensity that is very different. And the flecking in the maple really makes it sparkle. Really very cool (you'll have to take my word for it). I'm going to shellac paint each bar a random variation of blue.
Last month I also finished preparing my double star flag. It was quite an effort, and very stressful, fitting all the rays around the circles and overlapping each other but it turned out pretty damn well, much to my surprise.
Now I can finally finish painting all three of the new ones. Hopefully, they will be ready sometime in September and I can get to work on some more.

Tuesday, July 24, 2012

Building A Canoe: Steps II, III, and IV

After making the sawhorses, the next step was making the strips. I decided to make my canoe out of basswood and walnut because for some reason, I can't say why, I wanted as much of a dramatic contrast as I could get. I had thought about staining white cedar black but with all the sanding and shaping that is needed once it is together, I realized I would have to restain it after the assembly which wouldn't likely look too good because of the difficulty in getting the stain lines to be precise.


I had never worked with basswood before but it is known to be easy to work and it is light in color and weight. It isn't rot resistant like cedar but with all the epoxy and varnish, I didn't think it was really an issue. I also was concerned about the possibility that basswood and walnut would shrink and swell at significantly different rates but I checked and, though they aren't the same, they are in the same ball park. Again, with all the epoxy and varnish, I didn't think the changes would be significant. 


I've worked with walnut a lot and know it is also easy to work and relatively light, although I was surprised at how much more dense it is than basswood since I'm usually comparing it to maple or ash. I had notice basswood was mentioned as a wood choice in the Gilpatrick book but I had never heard of anyone building a canoe with walnut but I figured that was probably because of the cost. Objectively, it does seem like a crazy wood to chose but I'm not looking for a sane canoe, just one I'd like to look at.


In reality, the cost of the lumber is a real small part of the whole project, even with the walnut. Basswood is ridiculously cheap. I bought 28 board feet for $25.20. The walnut is of course much more expensive. The lumber yard was selling it for around $7.50/bd-ft but I figured I had enough older stock which I had bought for around $6.00/bd-ft so I didn't get any more (hopefully the price comes down before I need more) I didn't do an actual count of how much walnut I'm using but I'm sure the cost is under $30 (in comparison, the fiberglass and epoxy will cost around $600). To my surprise though, when I started milling the walnut I had, I found I had some exceptionally figured pieces. I actually would have preferred that it was straight grained because it would be easier to work but, hopefully, the curl will show through all the fiberglass. 


Once I had the lumber I spend a two or three days dimensioning it and then cutting the strips and milling them with cove and flute edges so the fit together tightly around the canoe forms. One of my goals in dimensioning was to get a variety of widths between 3/4" and 1". Luckily, I was able to get three sizes, 3/4", 7/8", and 15/16". Since my shop is pretty tight, I couldn't work with lumber larger than 9' so for the basswood my strips are either 4', 6', or 9'. With the walnut my strips are much smaller with the longest being 5'.


Based on the information in the Gilpatrick book, I thought I needed between 1400 and 1600 linear feet of strips. When I had finished I was a little short, only 1385 but given that my widths are greater than what he was using I hoped I'd be okay (after finishing about 1/3 of the canoe I've done another count and I'm sure I have plenty).
1385 linear feet of bead and flute strips
Normally the next step would be to build the strongback and canoe forms but I was lucky in having a friend of a friend lend them to me. Given that I don't foresee building another canoe, building the strongback is a lot of work for something that I don't even know where I'd store it when I'm done. Having the forms already made was also real helpful because the Gilchrist book doesn't provide clear dimensions and pulling the measurements off the drawings is difficult. 

As a side note, I think it is worth mentioning the size of the sawhorses again because I couldn't find any recommendation as to how high they should be. I ended up adding a couple of inches to bring them to 27". I'm 6'1" and I think that is a good height for me, make adjustments accordingly. The good thing about the two inch spacer is that I can easily remove them if I find that they are too high when I'm working on the bottom.
After I installed the first strip I walked away from the project for five days in fear that I wouldn't be able to do what I was envisioning. Until you start, it is difficult to understand how much the wood has to bend and I wasn't sure how I was going to attach small sections of strips, especially of the stiffer walnut, and get it to glue tight. That second row is a killer because it is the point of no return where you start gluing. 
After five days I worked up the nerve, bring all the clamps and fastening devices I could think I might be able to use. After the fact, I realize I should have flipped the strips so that the flute side was facing up. With the cove side facing up (as I did it) I risked damaging the edges as I clamped them between the forms. I would have re-done the first row because of it but I was nervous that I didn't have enough strips and didn't want to waste any. 
I quickly realized that staples would not work for holding the strips because the walnut was too hard -- the staples would just bounce off. So I ended up pre-drilling holes and attaching them with drywall screws. Unfortunately, this meant that the forms would be shot by the time I was done. I should have just made copies of them before starting so I wouldn't damage the borrowed ones but then I figured I'll just copy them when I'm done so the lender can get a new set.
I have been going with a random width, random length design. I don't want the finished piece to be at all visually predictable. Along with the dramatic contrast, I think it will be visually very interesting. Another feature that I'm planning on is to use different size walnut and maple dowels to fill all the drywall screw and staple holes (contrasting with the color of wood the hole is made). In addition to adding another layer of interest to the piece, I think it will give it a rougher look, which is important given that so much of it is made with walnut -- I don't want it to look too precious, I want it to look like it doesn't matter if it runs into rock and gets a dent.
In this last image you can see that I added one strip of cherry in the middle lower section. I really wanted one piece to be different than everything else and cherry is a nice intermediate color. Incidentally, this canoe would have been easier (and cheaper) to make with cherry instead of walnut. To my surprise, cherry is much easier to staple than walnut.
As I'm going along, I'm more pleased with how it is coming out. It is slow going though. With all the choices to make -- width, length, type of wood, avoiding lining up the joints, how to clamp or attach section, along with all the time needed to step back and admire the progress, along with the extra time needed to daydream -- it is taking me about 45 minutes per row per side. To give myself a mental break, every now and then I add an all basswood row, they are so much easier to install.